This article is a sort of report about blog migration.
On wordpress.com
Initially, I started this blog on wordpress.com. I chose wordpress.com thinking that I only need a small personal blog and I can easily live without any advanced features. I was pretty sure that I will post only technical articles, and do so quite rarely, so I searched for a free solution and wordpress.com was a good fit. And the experience was quite good in general: I did not have to configure anything, just choose a classic theme and go on writing.
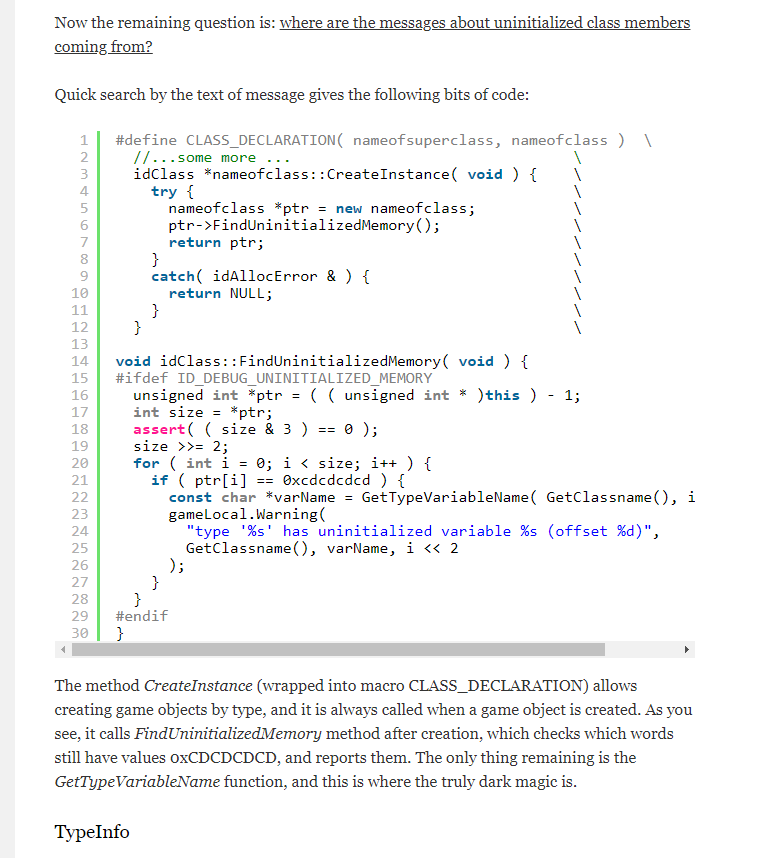
A problem which I noticed rather quickly is that the width of the text in my blog was way too small. The amount of text fitting into one line was small, and it was especially ugly for source code fragments. When I wanted to post a piece of code from somewhere, I had to add split lines into pieces, so that the whole code fits and no scroll bar appears.
I even had to simplify my own code because of this problem. The following piece of code from Doom 3 is a good example (the new version has plenty of space):
Fixing this problem is rather easy with CSS, but cannot edit CSS unless you switch to premium plan and pay monthly. I tried to search for new themes, but to no avail. At the end I decided that I should search for another hosting.
One way to get away from this limitations is to use wordpress.org on self-hosted site with custom domain. But it costs money again. Given that I do not need a full-blown website, I do not want to pay. In the age when I can freely share one gigabyte file or video with everyone, having to pay money for serving a few megabytes of website data is plain stupid.
Static website
Finally, I decided to move the blog to GitHub pages. It is free, and the concept of static blog is simple, fast, secure. Of course, there is a serious disadvantage: you have to install, configure, fine-tune a lot of stuff, fix some css styles, html templates. I would definitely advise against creating static blogs to all people who are either not familiar with website internals or not willing to spend some time to hack things together. Also, dynamic stuff (like comments) can be implemented only with ugly workarounds.
First of all, I had to choose a static blog generator. There are several such generators. The full list can be seen on netlify's staticgen.com site. All of them allow you to write articles in Markdown and apply various themes to the blog. Here are the options I chose from:
- Jekyll in Ruby. This option is clearly the most popular, and it is the only one integrated into GitHub (builds are simpler). Even though I have no experience with Ruby, I wanted to choose this option initially. But then I discovered that Jekyll is not supported on Windows. Moreover, you cannot even use Ruby packages without downloading and installing 1GB Linux subsystem. It became apparent that this ecosystem does not care for Windows users (which I am one of).
- Hexo in javascript. This option is less popular, but will probably rise in the nearest future. Using javascript for generating websites is a great idea, because any client-side code has to be in javascript anyway, so it is more convenient to use one language in both areas. I have suffered enough from javascript on my daily job, so I decided to avoid this too.
- Pelican in Python. This option is probably even less popular than Hexo. Python is a great language for a variety of tasks, and my experience with it is strongly positive. It is very user-friendly, truly cross-platform, does not have tons of stupid legacy stuff like javascript.
I decided to use Pelican at the end.
Quick-start
First of all, I created a pipenv environment, which works similar to how npm in node.js does. Although I never used pipenv before, it seems that it would be much easier to run Pelican on another machine if I do so.
I ran pelican-quickstart command to generate some initial files. Then I deleted the generated makefile and shell script, since there are of no use for me on Windows. It seems that they are duplicated by fabfile.py, which is also generated. To simplify running fabfile tasks, I created fab.cmd file:
pipenv run fab.exe %*
After I got familiar to existing fabfile tasks, I realized that I want some sort of watch & live reload option similar to what wevpack-dev-server provides. Following the article by Merlijn van Deen, I have added a livereload task to fabfile.py. It is based on livereload Python package and requires installing browser extension. Unlike the cited article, I later extended the livereload task to also watch over theme and config files:
def livereload():
    """Serve site at http://localhost:5500/ automatically livereload in browser"""
    # adapted from: https://merlijn.vandeen.nl/2015/pelican-livereload.html
    p = None
    def build_content():
        try:
            p.run()
        except SystemExit as e:
            pass
    def build_all():
        nonlocal p
        p = Pelican(read_settings('pelicanconf.py'))
        build_content()
    build_all()
    server = livereload_Server()
    server.watch('content/', build_content)
    server.watch('theme/', build_content)
    server.watch('pelicanconf.py', build_all)
    server.serve(root='output')
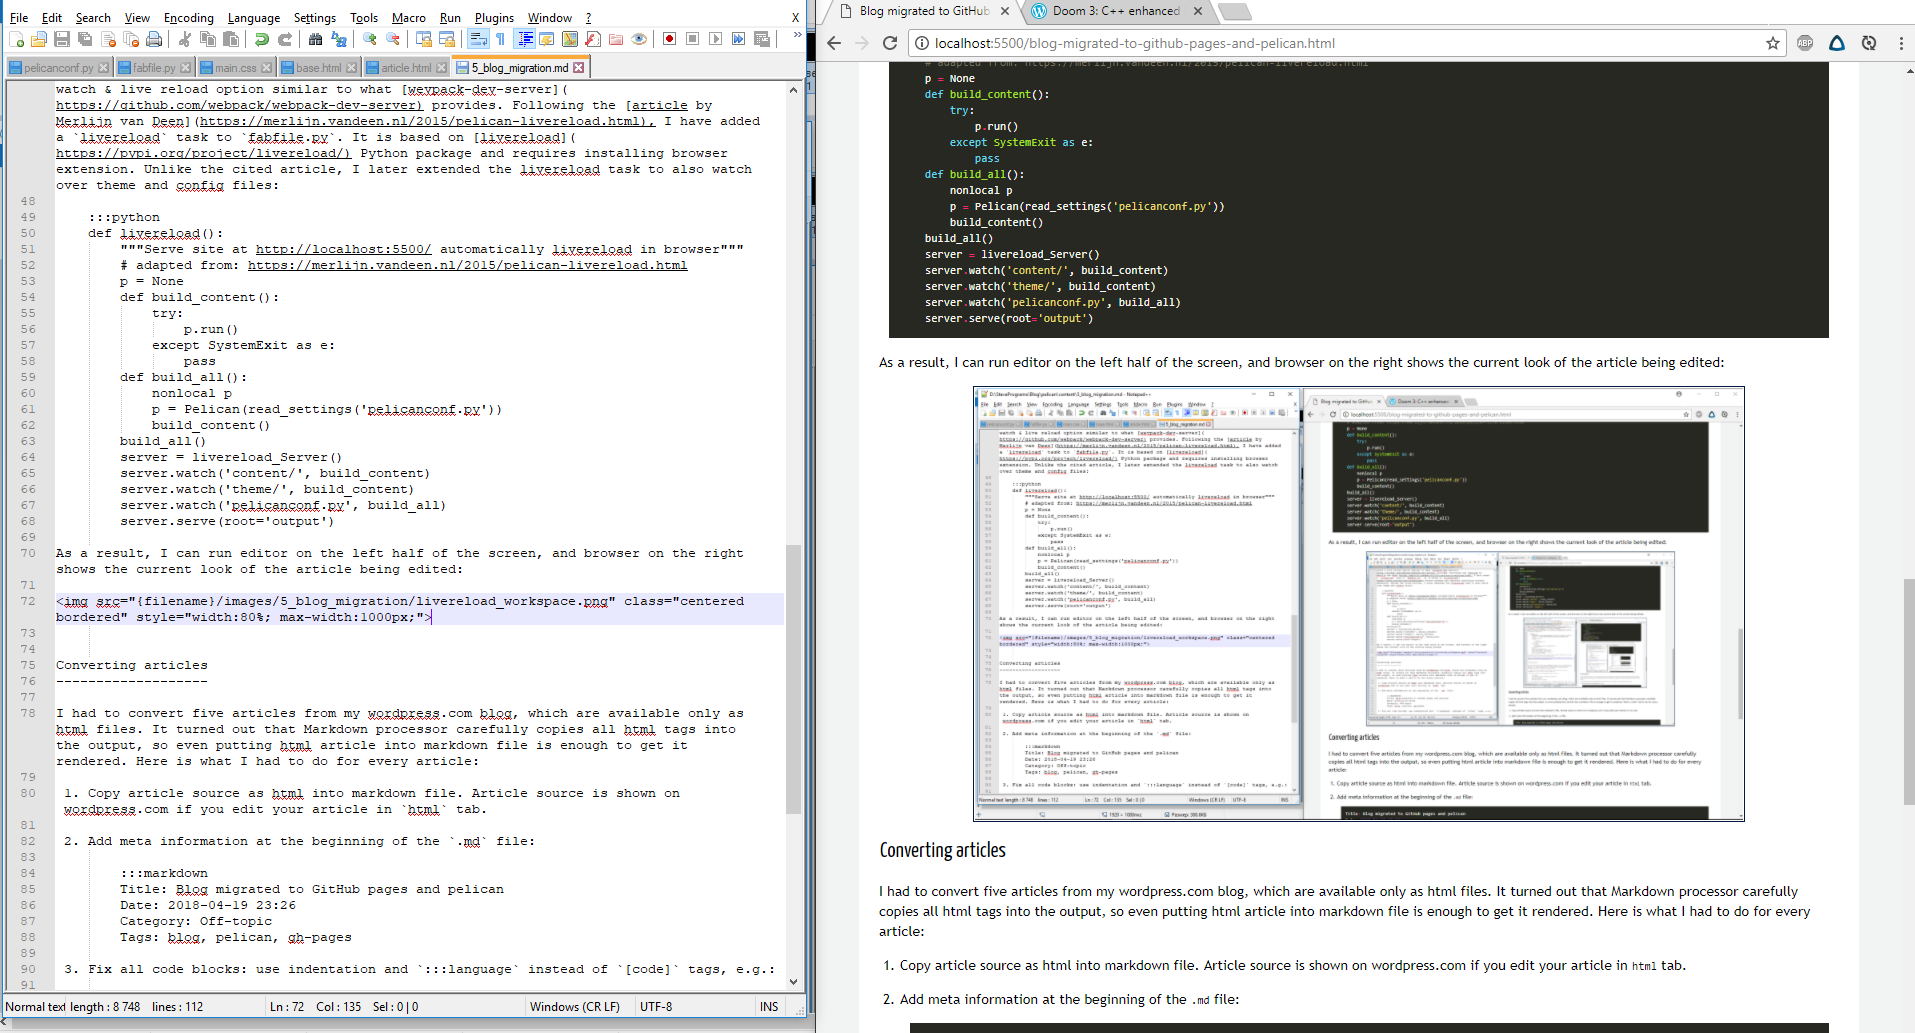
As a result, I can run editor on the left half of the screen, and browser on the right shows the current look of the article being edited:
Converting articles
I had to convert five articles from my wordpress.com blog, which are available only as html files. It turned out that Markdown processor carefully copies all html tags into the output, so even putting html article into markdown file is enough to get it rendered. Here is what I had to do for every article:
-
Copy article source as html into markdown file. Article source is shown on wordpress.com if you edit your article in
htmltab. -
Add meta information at the beginning of the
.mdfile:Title: Blog migrated to GitHub pages and pelican Date: 2018-04-19 23:26 Category: Off-topic Tags: blog, pelican, gh-pages -
Fix all code blocks: use indentation and
:::languageinstead of[code]tags, e.g.:The code starts by iterating over the elements to be moved: :::cpp for (size_t i = 0; i < Count; i += 4) { -
(Optional) Download all the images used in the article from wordpress.com, then fix all links to them in markdown files. Without doing so, the images will still be loaded from wordpress.com.
<img src="{filename}/images/0_doom3_typeinfo/uninitialized_warning_console.png" ... /> -
(Optional) Replace all html header tags with markdown headers. This was necessary because markdown toc extension does not understand html tags. So I had to do it later to make all headers referenceable.
-
Manually improve each and every image in the blog. First of all, I had some wordpress-specific images (
[gallery]tag) which had to be converted. Second, every image had to be resized and repositioned to look nice. In most cases, now I use something like:<img src="{filename}/images/0_doom3_typeinfo/typeinfo_scheme1.png" class="centered w500" />
Choosing a theme
Pelican has a set of themes which define the visual look of the blog and provide some features. Each theme consists of html templates for the pages, css styles, and sometimes a bit of javascript code. In fact, there are two criteria when choosing a theme:
-
How nice it looks: layout, fonts, colors, etc.
-
Which features it supports: responsiveness, categories and tags pages, integration of disqus comments and tipue search.
With livereload enabled, I started iterating over all themes in the repository of themes. But no theme perfectly matched my wishes. In fact, later I have learnt two things about choosing a theme:
-
Many themes by default turn off considerable part of their features. So, a brief visual look at the theme is not enough: you have to read through the theme's readme to see which features and additional customization are supported.
-
Taking an existing theme "as is" is unlikely to be enough anyway. Most likely you'll have to tweak a lot of stuff to your liking, which will require css + html knowledge and some time. With this point in mind, it is worth looking into theme's source code and see if you are ready to hack with it.
First I thought about using elegant or pelican-twitchy theme, since they have most features from the very beginning. But when I started investigating the topic of comments and search, it became clear that 1) search is easy to integrate, 2) I dislike out-of-the-box solutions for commenting. So I decided to concentrate more on the visual look of a theme and chose blueidea theme. As an additional benefit, this theme is also rather simple: all css styles (except code highlighting) are written in single css file, no javascript is used.
Customizing the theme
My initial idea was to list all the tweaks and customizations which I did to the blueidea theme. But while I spent more time tweaking html and css, I did more and more changes all over the code. At the end, the tweaking went out of control =) So I'll try to provide an overview of the changes and only describe the moments which I consider interesting.
Responsive
I made the theme responsive and mobile-friendly (originally this theme was fixed-width) with CSS3. To my surprise, it was very easy to do.
First, I added meta to base.html to disable scaling on mobiles:
<meta name="viewport" content="width=device-width, initial-scale=1.0"/>
Then I refactored main.css so that all width-related sizes were computed from a single variable. I added a main-width variable on body (which is sort of global):
body {
    --main-width: 1200px;
    background: #f2f3f3;
    /*...*/
}
And fixed all places where the width of the text area was used implicitly. Now it is deduced via calc function, e.g.:
#content {
    /*...*/
    padding: 20px 20px;
    width: calc(var(--main-width) - 40px);
    /*...*/
}
Finally, I added logic of choosing smaller values of main-width if browser screen width is not wide enough (using media queries):
@media screen and (max-width: 1400px) {
    body {
        --main-width: 1000px;
    }
}
@media screen and (max-width: 1100px) {
    body {
        --main-width: 800px;
/* ... more cases follow */
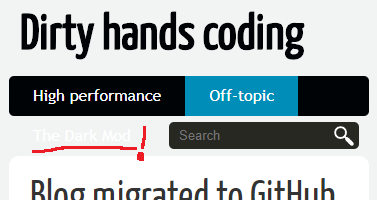
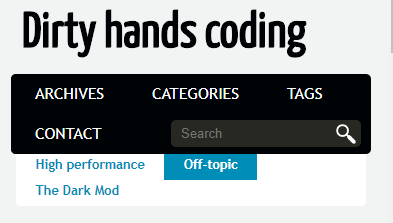
Another problem with blueidea theme is how it displays menu buttons on a small screen. Below you can see the old look on the left, and the new on the right (I marked the issue in red):
To ensure that buttons are correctly moved to the next line on overflow, it is enough to do the following:
#banner nav {
    overflow: auto;
    min-height: 40px;  /* instead of "height: 40px;" */
    /*...*/
}
Finally, I remember having to insert clear: both; somewhere to fix layout after right-aligned buttons.
Reference headers
I enabled markdown toc extension with anchorlink=True to make headers referenceable. Here is the corresponding section from pelicanconf.py:
MARKDOWN = {
    'extension_configs': {
        'markdown.extensions.toc': {'anchorlink': True},  #referenceable headers
        'markdown.extensions.codehilite': {'css_class': 'highlight'},
        'markdown.extensions.extra': {},
        'markdown.extensions.meta': {},
    },
    'output_format': 'html5',
}
It took me quite some time to realize that it does not apply to <h3>-like tags (i.e. html headers). So I had to replace html headers with their markdown equivalents in all the articles.
Menus and pages
I changed the set of items displayed on the top menu (in pelicanconf.py):
# hide categories in the main menu (little space there)
DISPLAY_CATEGORIES_ON_MENU = False
# display categories in a small submenu instead
DISPLAY_CATEGORIES_ON_SUBMENU = True

# buttons displayed in the main menu
MENUITEMS = (
    ('ARCHIVES', '/archives.html'),         # list of all articles (compact)
    ('CATEGORIES', '/categories.html'),     # list of categories (with counts)
    ('TAGS', '/tags.html'),                 # list of tags (with counts)
    ('CONTACT', '/pages/contact.html'),     # ordinary page with email address
)

# global html templates which are always rendered (even if unreferenced)
DIRECT_TEMPLATES = [
    'index', 'archives',
    'categories', 'tags',
    # 'authors',   --- don't need the list of authors
]
# do not generate per-author index pages
AUTHOR_SAVE_AS = ''
Featured article
I disabled featured article on all the index pages (in index.html template). My articles are usually too long, and having a featured article makes index pages indistinguishable from article pages.
    :::jinja
    {# note: DISPLAY_FEATURED_ARTICLE = False in pelicanconf.py #}
    {# First item #}
    {% if DISPLAY_FEATURED_ARTICLE and loop.first and not articles_page.has_previous() %}
        <aside id="featured" class="body">
Plugins
I enabled the following plugins:
-
render_math plugin to render LaTeX formulas via MathJax.
-
sitemap to aid indexing by search engines.
-
summary for configurable summaries on index pages. I configured
summaryplugin to detect<!--more-->tag as end of summary, exactly as on wordpress.com:PLUGIN_PATHS = ['plugins'] PLUGINS = [ 'summary', # ... ] SUMMARY_BEGIN_MARKER = '<!--summary-->' SUMMARY_END_MARKER = '<!--more-->' #as on wordpress.com -
share_post for buttons like "Share on Twitter". I spent huge amount of time on styling these buttons! I even had to draw a few missing icons myself=( This is because
blueideatheme does not supportshare_postplugin out-of-the-box: it is much easier to choose a theme which supports all the features you want. -
tipue_search for searching over the website (discussed in more detail later).
-
pelican_comment_system for user comments (discussed in more detail later).
Tipue search
The blueidea theme has builtin integration with duckduckgo search engine. The whole integration is trivial: when you enter some text into search box, trivial javascript callback redirects you to duckduckgo.com address with entered text and your site in http parameters:
{% if DISPLAY_SEARCH_FORM -%}
    <form id="search" action"#" onsubmit="javascript:window.open('https://duckduckgo.com/?q='+document.getElementById('keywords').value+'+site:{{ SITEURL }}');">
        <input id="keywords" type="text" />
    </form>
{% endif %}
This relies on external search engine and has its benefits and drawbacks. The main benefit is that google is much more intelligent and surely can do some stemming on your query. The drawback is that this search will only work properly after the up-to-date version of site gets visited by search engine crawlers.
So I decided to go the full static route and integrate full-javascript search instead. Luckily, tipue search is already available for this purpose. It is integrated into several pelican themes, including the aforementioned elegant theme.
The way it works is very simple: during pelican build, it produces file tipuesearch_content.json, which contains the plain text of each article. When user enters some keywords into the search box, he is redirected to search.html page (with entered text passed as http parameter). Here tipuesearch.js runs. It checks how much keywords are present as substrings in each article and sorts articles by this number decreasing (well, title and tags also influence the score). The articles which contain none of the keywords are excluded from the results list. Finally, it splits results into pages and generates their html representation into search-content element.
The integration of tipue search into pelican site is very well covered in the mygeekdaddy's article. I won't repeat everything, just mention a few important things:
-
I had to change
tipue_search.pyfile in the source code oftipue_searchplugin, as described here. Due to some weird reason, the plugin puts addresses intourlproperty, while the javascript code expects them inlocproperty. This is easily fixed by updating two places in the python code:node = {'title': page_title, 'text': page_text, 'tags': page_category, 'loc': page_url, #note: write address to 'loc' too 'url': page_url} -
Since
search.htmltemplate is not referenced directly in any html files, pelican will not render it by default. To force rendering of this file, it must be marked as direct template inpelicanconf.py:DIRECT_TEMPLATES = [ 'index', 'categories', 'authors', 'archives', #(default) 'search', #tipue search results ]
Comments
Integrating comments is a big problem for all static blogs. Mainly because whenever reader leaves a comment, it must somehow alter the website, which contradicts with the fact that it is static. A static blog has no server which could receive the comments from user and update the blog contents. On the other hand, a static blog can communicate with foreign servers all over the web.
Overview
There are several known ways to integrate comments into static blog:
-
Integration with Disqus. This is the simplest and the most common choice, it is integrated in most pelican themes, including
blueideatheme. In this case all the comments are stored on Disqus servers, the blog only displays them and works as a frontend for adding more comments to those servers. While Disqus is a good option in general, there are some negative views on it over the web: ads and sponsored comments, ownership privacy and openness questions, slowness and privacy again. -
All the comments are stored in the blog's repository and they are compiled by blog generator just as articles do. The pelican_comment_system plugin does this exactly: it translates comments from markdown files into the html code, just as pelican does for all articles by default. So the main question is how can reader comments get from the static website into the repository. Here are some options:
2.a. Reader sends his comment to the author of blog via email. He can either do it manually, or click on a button with
mailto:link. The default templatecomments.htmlofpelican_comment_systemplugin works this way.2.b. Reader sends his comment to staticman server, which commits it into predefined GitHub repository. It either pushes changes directly or submits pull requests which blog owner has to review and approve. It is possible to configure so that comments appear on the site in almost real time soon after reader posts it. To achieve it, some continuous integration is needed (or simply using Jekyll and GitHub pages). You can read more about
staticmanintegration e.g. in this article.2.c. When reader decides to leave a comment, he is redirected to GitHub page of an issue in blog owner's repository. This issue is created in advance by blog owner specifically for the article being commented. Reader posts his message as a comment on this GitHub issue, and it is saved there. The blog owner uses GitHub public API to fetch comments on the issues at any time. This workflow is described in this article and is implemented in gitment project for Hexo.
Choice
While I think Disqus is perfectly suitable for comments, I once again decided to go the "purist's way" and treat all the comments as part of my blog.
The option 2.b is very nice, but it looks quite complicated and it relies on the third-party server (api.staticman.net). Also it ties your blog repository to GitHub, which btw does not allow free private repositories.
The option 2.c is rather simple. But it requires user to have GitHub login (unlikely a problem though) and it redirects user to GitHub site to even start writing his comment (maybe this is fixable).
I chose the option 2.a with sending comments over email. In my opinion, it is the most proper way of commenting static sites. It returns us back to roots: if you want to say something, just send an email to the author. No intermediary is needed, embrace direct communication.
The email-based system does not depend on any third party. Since everyone uses emails for a long time, it is much more reliable than any custom server. And even if e.g. Gmail becomes unusable, I can easily switch to another email provider. Everyone who reads technical blogs has an email box (probably even several of them), so no special login is required. Commenting is as secure as emails are, since no information leaves reader's machine except for the email, which he sends himself.
Implementation
The first step was to enable the plugin itself. In order to play with it a bit, I manually converted all comments from the wordpress.com site into markdown files. It did not take much time, since I don't have many comments yet.
The html template and javascript code was initially taken from the plugin's official example (html and js).
However, I had to change it quite heavily. Also, I had to write all the styles myself. The blueidea theme supports only Disqus comments, and I could not even see how these comments were originally supposed to look. The major points are listed below.
Collapsible.
The whole commenting section is collapsible. In fact, it is collapsed by default (unless javascript is disabled). This is one of the arguments used to popularize elegant theme =)
The collapsing and expanding is done by javascript code, animation is done via css transition. I was quite unhappy that there is no way to animate max-height to the actual height of the content, so I had to do some hacks:
//getting height of potentially hidden element: https://stackoverflow.com/a/2345813/556899
var previousStyle = content.attr("style");
content.css({position: 'absolute', visibility: 'hidden', display: 'block', maxHeight: 'none'});
fullHeight = content.height() + 100;
content.attr("style", previousStyle || "");
And another hack was needed to trigger transition when I change max-height property:
content.css({maxHeight: (isExpanding ? 0 : fullHeight) + 'px'});
content.css('maxHeight');   //why is this needed?
content.css({maxHeight: (isExpanding ? fullHeight : 0) + 'px'});
View email source.
Reader can click a button to see the generated email contents before sending it. This is especially helpful if reader's machine is not properly configured to open mailto links: then he can copy/paste the message into his web client and send it manually (avoiding mailto link).
Move form on reply. When reader clicks a "reply" button near existing comment, the comment form moves to the place immediately after it. Also, dynamic content showing that currently a reply is being composed is moved to the header (legend).
Spam protection. The sample code has some protection of blog author's email, but not very good, so I decided to obfuscate it a bit further. Plus, added a minor nuisance for a potential bot filling the form.
Mailto config help. I added a link to page where it is explained how to configure Chrome to open mailto links in Gmail. I think it is important, because a lot of people use web mail client but don't know how to open mailto links with it. To be honest, I plan to create a special page behind this button, which would thoroughly explain how commenting system works and how to use it easily.
Even-odd coloring.
To distinguish consecutive comments from each other, every even comment has gray background. Astonishingly, css even has a rule nth-child(2n) for it, which is used in blueidea styles for Disqus comments. However, it works incorrectly with nested enumerations.
The problem is fixed by assigning even/odd classes to comments during html generation. Notice the namespace hack to circumvent scoping rules of jinja:
<ul>
{% set recursive_counter = namespace(a=0) %}
{% for comment in article.comments recursive %}
    {% set recursive_counter.a = recursive_counter.a + 1 %}
    <li id="comment-{{comment.slug}}">
        <div class="comment-left">
            <!-- ... -->
        </div>
        <div class="comment-body">
            <div class="comment-self {{'even' if recursive_counter.a % 2 else 'odd'}}">
                <!-- ... -->
                <div class="pcs-comment-content" {# class used as id in comments.js#}>
                    {{ comment.content }}
                </div>
            </div>
            {% if comment.replies %}
                <ul>
                    {{ loop(comment.replies) }}
                </ul>
            {% endif %}
        </div>
    </li>
{% endfor %}
</ul>
Android issue
I stumbled upon a nasty issue in Chrome browser on Android. When I open an article from my blog in the browser, it loads the page, and soon after that it hangs for noticeable time. The whole process is completely frozen. It becomes unresponsive and OS soon suggests to kill it. Chrome profiler (via remote debugging) shows nothing, so the hang happens somewhere in the internals.
I noticed the following:
-
If I remove all images from the page, the issue still happens. If I remove all javascript code, the issue still happens. If I remove all css files, the issue still happens. In fact, even if I remove everything except the html file itself, the issue still happens.
-
The issue does not happen if I remove all code fragments from the page.
-
The length of the freeze is dependent on the page, but on this article it takes literally minutes.
-
The freeze happens on Chrome for Android recent version (66.0.3359.126). It does not happen on stock version of Chrome (55.0.2883.91), and it does not happen on Firefox.
So it looks like a bug caused by bulky html of the code fragments. I'll probably try to submit a bug report about it.
Publish
The very last thing for a new static website is to publish the result.
All the differences between local development environment and deployment environment are usually described in publishconf.py file. By default, command fab preview can be used to build website with this publishing config. Here is what I have in my publishconf.py:
from pelicanconf import *

SITEURL = 'https://dirtyhandscoding.github.io'
RELATIVE_URLS = False

OUTPUT_PATH = 'publish_output/'
DELETE_OUTPUT_DIRECTORY = True
OUTPUT_RETENTION = [".hg", ".git", ".nojekyll"]
As you see, the differences are minimal:
-
The final URL of the site is specified, so all the internal links are expressed as absolute paths using it.
-
The result is generated to a different
publish_outputsubdirectory. The contents of this directory are cleaned before every build, except for.hgand.gitsubdirectories (mercurial/git repository) and.nojekyllfile (disables Jekyll build on GitHub pages), which are saved between builds.
I honestly dislike git and prefer using mercurial (TortoiseHG) to do things. Also, I want to have full control over the publishing operation, performing it manually. That's why I cannot use the popular ghp-import tool.
Instead, I simply maintain a second mercurial repository inside publish_output subdirectory specifically to track the final website data. Whenever I want to publish new version, I run fab preview, then do a full commit in this mercurial repo and review changes. Finally, I push the current state to GitHub using hg-git extension.
UPDATE: Unfortunately, TortoiseHG failed to push my blog output to GitHub. Most likely due to some restrictions on the GitHub side, because smaller commits are pushed successfully. Did not manage to find out what the problem was. Unhappily switched to TortoiseGit for pushing the output =(
Now that it is complete, I feel tired of all the hacking done. On the positive side, I have learnt a lot about html and css. Let's hope that this blog won't need much care in the nearest future =)